Hosting personal website on Google Cloud
I have this website hosted on GitHub Pages, but I decided to learn how to work with GCP, GitHub Actions, and Terraform.
So, here we go!
The official documentation on How to host a static website on GCP is great.
I will omit the steps to create a GCP account and set up billing because they're boring. I'll focus on the high-level steps with some code snippets to illustrate the process.
Diagram
The diagram below shows the components I use and their relationships.

Google Cloud Platform (GCP)
GCP has a free tier that allows you to host a static website for free. See: https://cloud.google.com/free/docs/free-cloud-features#storage
Free Tier is only available in us-east1, us-west1, and us-central1 regions.
GCP is organized into projects. Each project has its own resources, billing, and permissions.
So, the first step is to create a project.
I am using the gcloud CLI to create the project.
gcloud projects create pp-ua-site-project
Although I prefer using the CLI over the web console (old school), there is an even better approach: following IaC (Infrastructure as Code) principles. So, I will use Terraform to create the project and all the resources.
Terraform
Let's lay the groundwork for our infrastructure.
Here's the bare minimum Terraform configuration to get started.
I'll start with the vars.tf file.
Define variables for:
- project name (the one that is created in GCP)
- region (the one that is free tier eligible)
# terraform/vars.tf

variable "region" {
  description = "The GCP region to deploy resources in"
  type        = string
  default     = "us-east-1"
}
variable "project_name" {
  description = "Name of the project"
  type        = string
  default     = "pp-ua-site-project"
}
Now, let's create the main.tf configuration file.
Terraform automatically reads variables from the file if you name it vars.tf and put it in the same directory as main.tf.
# terraform/main.tf
terraform {
  required_providers {
    google = {
      source  = "hashicorp/google"
      version = "~> 3.5"
    }
  }
}
provider "google" {
  project = var.project_name
  region  = var.region
}

resource "google_project" "website_project" {
  name       = var.project_name
  project_id = var.project_name
}
The variables are referenced using the var.<variable_name> syntax.
Let's terraform the ground.
If the resource is already created using the CLI or web UI, you can import it into the Terraform state using the
terraform importcommand.
# command
terraform import google_project.website_project projects/pp-ua-site-project
# output
google_project.website_project: Importing from ID "projects/pp-ua-site-project"...
google_project.website_project: Import prepared!
  Prepared google_project for import
google_project.website_project: Refreshing state... [id=projects/pp-ua-site-project]

Import successful!

The resources that were imported are shown above. These resources are now in
your Terraform state and will henceforth be managed by Terraform.
Nice, my local Terraform is synced with the remote GCP resources.
Now, when I run terraform apply, it will not create a new project, but will update the existing one.
# output
google_project.website_project: Refreshing state... [id=projects/pp-ua-site-project]

No changes. Your infrastructure matches the configuration.

Terraform has compared your real infrastructure against your configuration and found no differences, so no changes are needed.

Apply complete! Resources: 0 added, 0 changed, 0 destroyed.
At this point, we have a project created in GCP.
GCP Cloud Storage
I use Cloud Storage to store static files (HTML, CSS, JS, images).
Cloud Storage is a service for storing your objects in Google Cloud. An object is an immutable piece of data consisting of a file of any format. You store objects in containers called buckets.
Source: https://cloud.google.com/storage/docs/introduction
The free tier allows you to store up to 5GB of data in Cloud Storage.
I believe my website should fit within this limit :)
Add the bucket resource to the main.tf file.
# terraform/main.tf
resource "google_storage_bucket" "website_bucket" {
  name     = var.bucket_name
  location = var.location
  website {
    main_page_suffix = "index.html"
    not_found_page   = "404.html"
  }
}
# terraform apply
The billing account for the owning project is disabled in state absent, accountDisabled
Oops. I need to enable billing for the project. I had to go to the GCP console and enable billing for the project. I just didn't want to create another billing account, so I used the existing one.
Let's try terraform apply again.
# output
google_project.website_project: Modifying... [id=projects/pp-ua-site-project]
google_storage_bucket.website_bucket: Creating...
google_storage_bucket.website_bucket: Creation complete after 1s [id=pp-ua-site-bucket]
google_project.website_project: Modifications complete after 3s [id=projects/pp-ua-site-project]

Apply complete! Resources: 1 added, 1 changed, 0 destroyed.
Cool. Now we have a container (bucket) to store our static files.
GitHub Actions
The next step is to upload files to the bucket. I have my static files stored in the GitHub repository. So, first I have to create a CI/CD pipeline to upload files to the bucket.
I will use GitHub Actions to do that.
GitHub Actions is a continuous integration and continuous delivery (CI/CD) platform that allows you to automate your build, test, and deployment pipeline. You can create workflows that run tests whenever you push a change to your repository, or that deploy merged pull requests to production.
Source: https://docs.github.com/en/actions/writing-workflows/quickstart
There are templates available for GitHub Actions, but I can't find one for Cloud Storage/Bucket.
Templates: https://github.com/actions/starter-workflows/tree/main/deployments
So, I will create a custom workflow to upload files to the bucket.
Pipeline
Let's break down the pipeline into steps.
- Checkout the files from the repository
- Authenticate to GCP
- Upload files to the GCP bucket
Using existing actions for each step to simplify the workflow:
- https://github.com/actions/checkout
- https://github.com/google-github-actions/auth
- https://github.com/google-github-actions/upload-cloud-storage
The pipeline should be triggered every time I push my changes to the main branch.
Let's create a new file in the .github/workflows directory.
# .github/workflows/gcp-bucket-deployment.yaml
name: Deploy to Google Cloud Storage

on:
  push:
    branches:
      - main

jobs:
  deploy:
    # Any runner supporting Node 20 or newer
    runs-on: ubuntu-latest
    environment: gcp

    # Add "id-token" with the intended permissions.
    permissions:
      contents: 'read'
      id-token: 'write'

    steps:
    - id: 'checkout'
      uses: 'actions/checkout@v4'

    - id: 'gcp_auth'
      uses: 'google-github-actions/auth@v2'
      with:
        project_id: '$'
        credentials_json: '$'

    - id: 'gcp_upload_file'
      uses: 'google-github-actions/upload-cloud-storage@v2'
      with:
        path: 'docs'
        destination: $
GCP Service Account
To make it work, I need to create a service account in GCP and give it permissions to upload files to the bucket.
I don't want to use my personal account credentials anywhere except my local machine.
I'll create a service account for GitHub.
A service account is a special kind of account typically used by an application or compute workload, such as a Compute Engine instance, rather than a person. A service account is identified by its email address, which is unique to the account.
Source: https://cloud.google.com/iam/docs/service-account-overview
GCP Identity and Access Management (IAM)
Now I have to make sure the service account has only read/write access to my bucket.
IAM allows you to control who has access to the resources in your Google Cloud project.
I will use Terraform to create the service account and give it permissions.
To find out the role to use for the service account, see: https://cloud.google.com/storage/docs/access-control/iam-roles
The role Storage Object User (roles/storage.objectUser) looks like a good role to use for the service account.
# terraform/main.tf
resource "google_service_account" "website_service_account" {
  account_id   = "website-service-account"
  display_name = "Website Service Account"
  project      = google_project.website_project.project_id
}
resource "google_storage_bucket_iam_member" "website_bucket_iam_member" {
  bucket = google_storage_bucket.website_bucket.name
  role   = "roles/storage.objectUser"
  member = "serviceAccount:${google_service_account.website_service_account.email}"
}
GCP_SA_KEY – see how to create/get a key for your service account here: https://cloud.google.com/iam/docs/keys-create-delete#iam-service-account-keys-create-console
Configuring GitHub
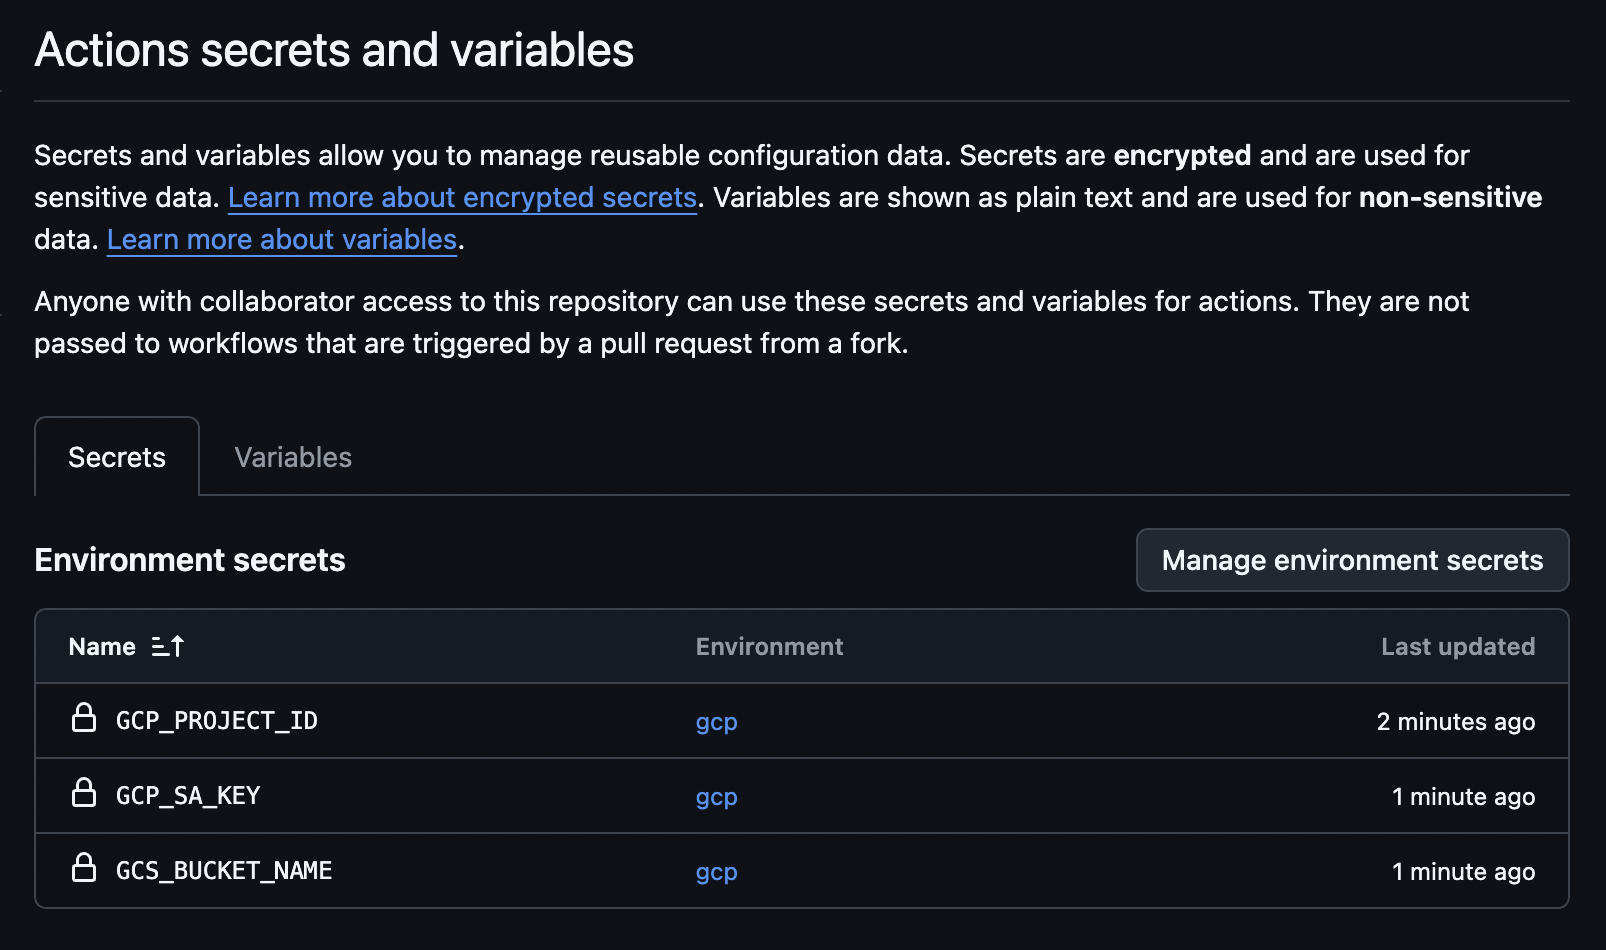
Before adding the workflow to my repo, I need to configure environment variables in my repo.
In the GitHub repo, go to /settings/secrets/actions.
Create a new environment to store secrets for GCP.
I'll name it gcp.
Add the following environment secrets:
- GCP_PROJECT_ID
- GCP_SA_KEY
- GCS_BUCKET_NAME
Kick-off the Pipeline
Add the file .github/workflows/gcp-bucket-deployment.yaml to git, commit, and push changes upstream.
It should kick off the pipeline.
Check the GitHub Actions page.
It works!
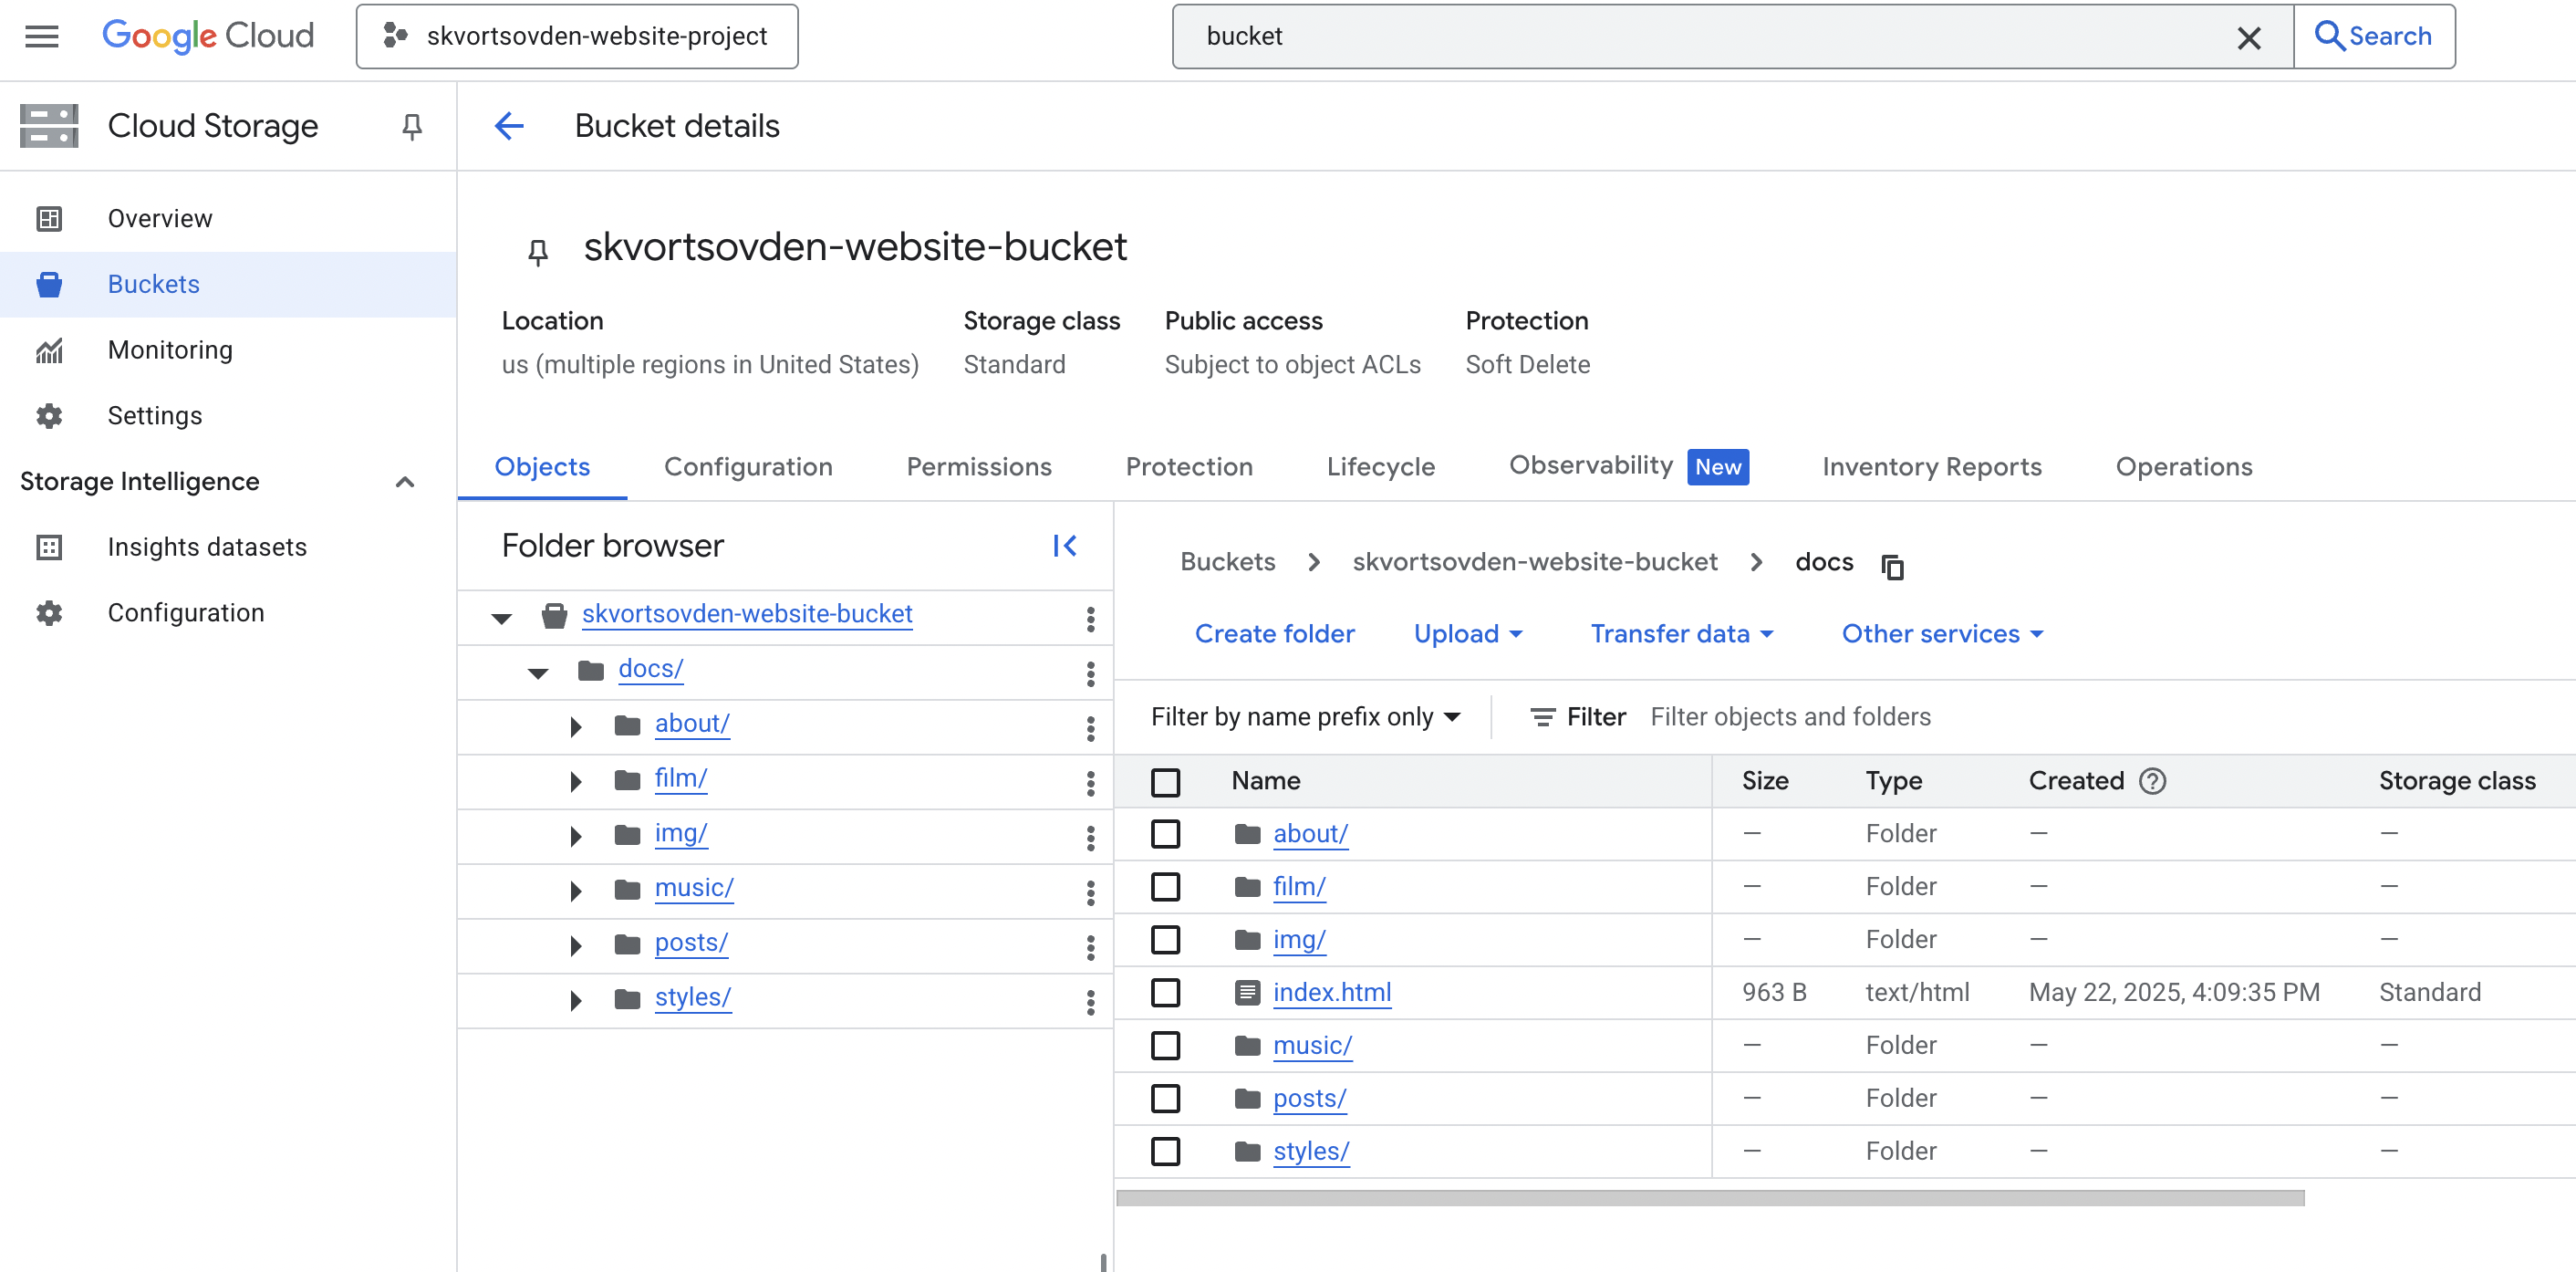
I have all my files uploaded to the GCP bucket now.
Cool. But how do I make it publicly available?
Let's navigate to this page and steal the Terraform snippet:
https://cloud.google.com/storage/docs/hosting-static-website#terraform_1
# Make bucket public by granting allUsers storage.objectViewer access
resource "google_storage_bucket_iam_member" "public_rule" {
  bucket = google_storage_bucket.website_bucket.name
  role   = "roles/storage.objectViewer"
  member = "allUsers"
}
After making my files on the bucket accessible from the internet by link: https://storage.googleapis.com/pp-ua-site-bucket/docs/index.html
Next, I want to make it available by a short domain name.
Connecting your domain to Cloud Storage
For this exercise, I didn't want to spend any money, so I found a way to register a free domain name using the Ukrainian hosting provider nic.ua.
You can register a .pp.ua domain name for free!
Once that's done, I need to point my domain to the bucket.
To connect your domain to Cloud Storage, create a CNAME record through your domain registration service.
Source: https://cloud.google.com/storage/docs/hosting-static-website-http#cname
One more thing to make it work with my DNS and GCP bucket: I have to name my bucket the same as my domain name.
Create a bucket whose name matches the CNAME you created for your domain.
Source: https://cloud.google.com/storage/docs/hosting-static-website-http#create-bucket
Eventually, my website became available at http://www.skvortsovden.pp.ua
Cloudflare
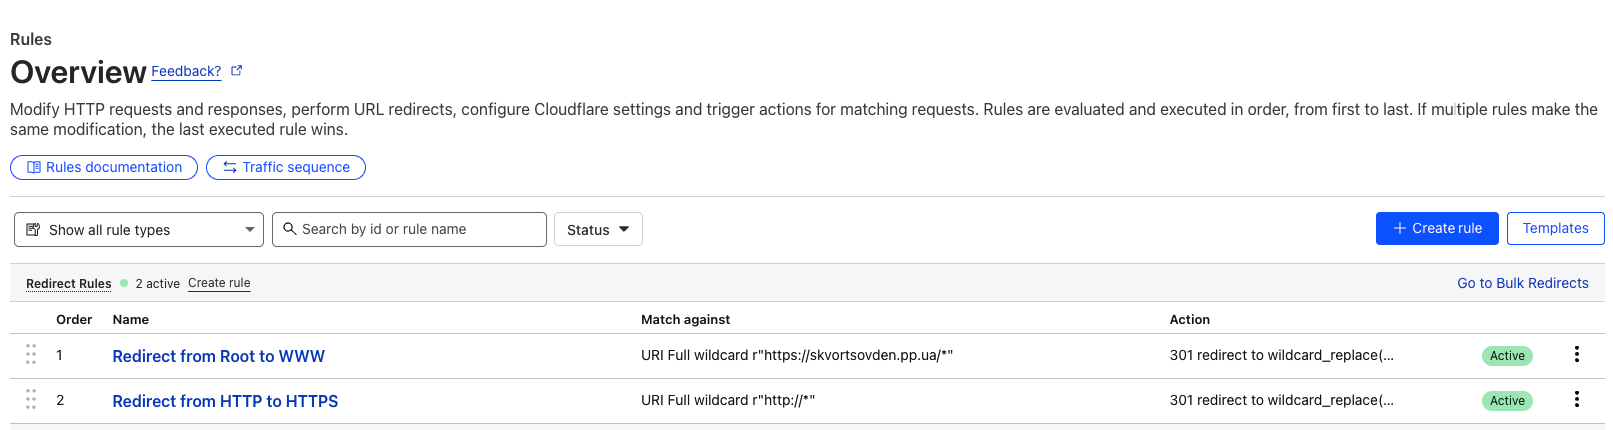
Having my website accesible at www is ok, but I also want it to be accesible at root - skvortsovden.pp.ua.
Also, I'd like to have SSL enabled.
What is Cloudflare?
Cloudflare is a Content Delivery Network (CDN). It provides features to route and distribute traffic to your website, as well as secure connections via TLS/SSL.
read more: https://www.cloudflare.com/en-gb/learning/what-is-cloudflare/
To make it work I just added two rules on Cloudflare:
- Redirect from root to www
- Redirect from HTTP to HTTPS
Keep in mind that DNS propagation can take some time.
Whenever you update or add DNS records, allow some time for the changes to take effect globally.
Things I learned
- A project is the top-level abstraction in GCP.
- Each project must be linked to a billing account.
- Terraform uses local state to track the status of resources in the cloud.
- Terraform automatically detects variables from the
vars.tffile located next tomain.tf. - Service accounts and IAM roles work together to grant access and set permissions for external services like GitHub Actions.
- DNS A records point to IP addresses, while CNAME records point to other DNS names.